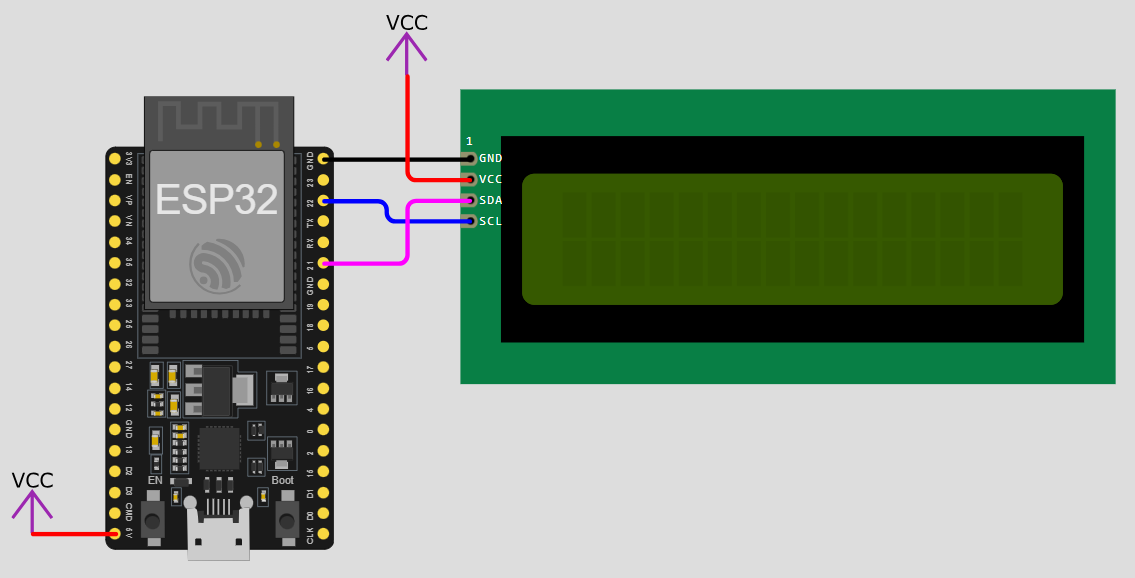
16×2 LCD 是一種常見的顯示模組,具有 16 行(column)和 2 列(row)的顯示區域,總共可以顯示 32 個字元。I2C(Inter-Integrated Circuit)是一種串列通信協議,利用 SCL (CLK信號) 和 SDA (Data信號) 兩條線來傳輸數據。I2C 16×2 LCD 模組可以顯示文字、數字或其他簡單的圖形。
基本範例:
#include <LiquidCrystal_I2C.h> // 引用LiquidCrystal_I2C函式庫
LiquidCrystal_I2C lcd(0x27,16,2); // 建立LiquidCrystal_I2C物件,名稱為lcd
void setup() {
//--------------------------------------------------------------
Serial.begin(9600); // 啟用串列埠監看視窗
//--------------------------------------------------------------
lcd.init(); // 初始化 lcd
lcd.backlight(); // 開啟背光
//--------------------------------------------------------------
}
void loop() {
lcd.setCursor(0,0); // 定位在(column 0, row 0)
lcd.print("Hello, world."); // 印出內容
lcd.setCursor(0,1); // 定位在(column 0, row 1)
lcd.print("This a test."); // 印出內容
lcd.cursor(); // 顯示游標
lcd.blink(); // 游標閃爍
delay(3000);
lcd.clear(); // 清除
lcd.setCursor(1,0); // 定位在(column 2, row 0)
lcd.print("Here is row 0."); // 印出內容
lcd.setCursor(0,1); // 定位在(column 2, row 1)
lcd.print("Here is row 1."); // 印出內容
lcd.noBlink(); // 游標不閃爍
delay(3000);
lcd.noCursor(); // 隱藏游標
delay(3000);
lcd.clear(); // 清除
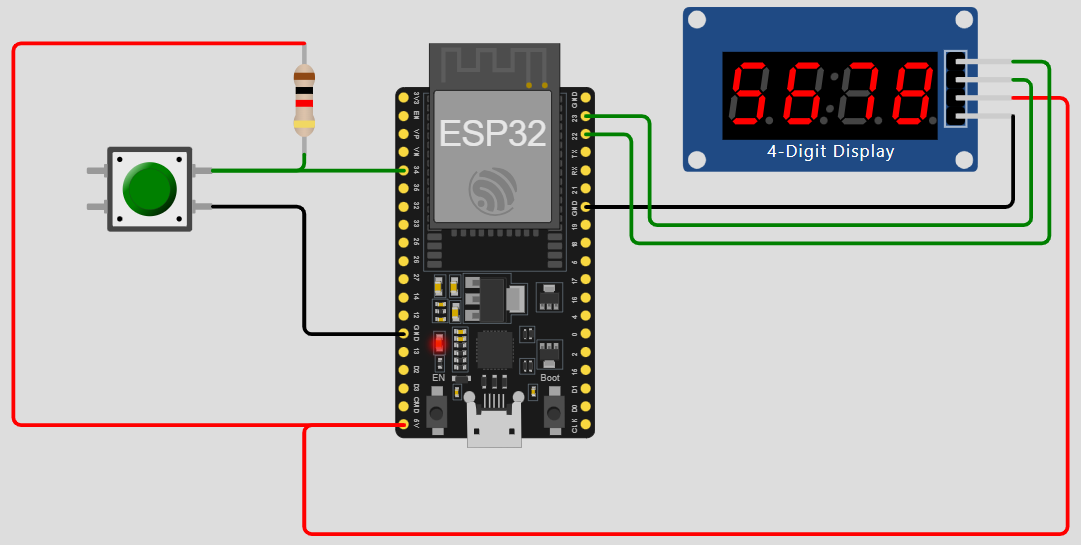
}在2025年12月18日的作業中,若將4位元七段顯示器改成I2C LCD模組,參考接線與程式如下:
//-----------------------------------------------------------------------------
#include <OneButton.h>         // 引用OneButton函式庫
#define pb 34                  // 定義按鈕引腳
OneButton button(pb, true);    // 建立OneButton物件,名稱為button,按鈕為低態動作
//-----------------------------------------------------------------------------
#include "TM1637.h"            // 引用TM1637函式庫,並定義TM1637接腳
#define CLK 22                 // CLK為時脈接腳
#define DIO 23                 // DIO為資料接腳
TM1637 tm1637(CLK, DIO);       // 創立一個TM1637物件,名稱為tm1637
//-----------------------------------------------------------------------------
int num[4] = {0, 0, 0, 0};     // 4位數字陣列 {仟位,百位,十位,個位}
//-----------------------------------------------------------------------------
bool startCount = 0;           // (0:停止,1:開始)
int count = 9999;              // 計數器,初值為0
//-----------------------------------------------------------------------------
unsigned long previousMillis = 0;     // 前一次的millis()時間
const long interval = 500;            // 預設計時的時間
//-----------------------------------------------------------------------------
int input = 0;

void setup() {
  //--------------------------------------------------------------
  Serial.begin(9600);  // 啟用串列埠監看視窗
  Serial.println("Please enter a number(0~9999):");   // 輸入提示
  //--------------------------------------------------------------
  button.attachClick(singleClick);              // 單擊
  button.attachDoubleClick(doubleClick);        // 雙擊
  button.attachLongPressStart(longPressStart);  // 長按開始
  button.attachDuringLongPress(longPress);      // 長按過程中
  button.attachLongPressStop(longPressStop);    // 長按結束
  //--------------------------------------------------------------
  tm1637.init();               // 初始化TM1637
  tm1637.set(BRIGHT_TYPICAL);  // 設定亮度,範圍是0到7,預設值為2
  //--------------------------------------------------------------
}

void loop() {
  //----------------------------------------------------------
  //串列埠監看視窗輸入
  //----------------------------------------------------------
  if (Serial.available()) //若串列埠有輸入資料,則執行下列程式區塊
  {
    input = readNumber();
    if (input >= 0 && input <= 9999)
    {
      count = input;
    }
    else
    {
      //若輸入字串無效(其他)
      Serial.println("Unknown range.");
      Serial.println("Please enter a number(0~9999):");   // 輸入提示
    }
  }

  //----------------------------------------------------------
  unsigned long currentMillis = millis();

  if (currentMillis - previousMillis >= interval)
  {
    previousMillis = currentMillis;
    //----每經過一個interval的時間,想做的事----
    if(startCount == 1)
    {
      count--;
      if (count==0)
      {
        startCount = 0;
      }
    }
    //--------------------------------------
  }

  //----------------------------------------------------------
  button.tick(); // 定期偵測按鈕狀態
  //----------------------------------------------------------
  // 設定與轉換七段顯示器每個位元要顯示的數字
  num[0] = count / 1000 % 10;   // 千位
  num[1] = count / 100 % 10;    // 百位
  num[2] = count / 10 % 10;     // 十位
  num[3] = count % 10;          // 個位
  tm1637.display(0, num[0]);    // 顯示第一位
  tm1637.display(1, num[1]);    // 顯示第二位
  tm1637.display(2, num[2]);    // 顯示第三位
  tm1637.display(3, num[3]);    // 顯示第四位
  //----------------------------------------------------------
}

// 單擊處理
void singleClick() {
  Serial.println("Button Click.");
  startCount = !startCount;           // 取反相
}

// 雙擊處理
void doubleClick() {
  Serial.println("Button Double Click.");
}

// 長按開始
void longPressStart() {
  Serial.println("Button Long Press Start.");
}

// 長按過程中
void longPress() {
  Serial.println("Button Long Press ......");
}

// 長按結束
void longPressStop() {
  Serial.println("Button Long Press Stop.");
  count = 1000;        // 重置計數器
  startCount = 0;
}

// 讀取一個整數
int readNumber()
{
  while (!Serial.available());  // 等待串列埠輸入
  String input = Serial.readStringUntil('\n');  //讀取一行的輸入資料,直到換行符號為止(按下enter鍵)
  input.trim();                 //去除輸入字串前後的空白字元
  Serial.println(input);        //印出輸入字串
  return input.toInt();         //轉換為整數
}
//---------------------------------------------------------------------------------
#include <OneButton.h>              // 引用OneButton函式庫
#define pb 34                       // 定義按鈕引腳
OneButton button(pb, true);         // 建立OneButton物件,名稱為button,按鈕為低態動作
//---------------------------------------------------------------------------------
#include <LiquidCrystal_I2C.h>      // 引用LiquidCrystal_I2C函式庫
LiquidCrystal_I2C lcd(0x27,16,2);   // 建立LiquidCrystal_I2C物件,名稱為lcd
//---------------------------------------------------------------------------------
int num[4] = {0, 0, 0, 0};          // 4位數字陣列 {仟位,百位,十位,個位}
//---------------------------------------------------------------------------------
bool startCount = 0;                // (0:停止,1:開始)
int count = 9999;                   // 計數器,初值為0
//---------------------------------------------------------------------------------
unsigned long previousMillis = 0;   // 前一次的millis()時間
const long interval = 500;          // 預設計時的時間
//---------------------------------------------------------------------------------
int input = 0;

void setup() {
  //--------------------------------------------------------------
  Serial.begin(9600);  // 啟用串列埠監看視窗
  Serial.println("Please enter a number(0~9999):");   // 輸入提示
  //--------------------------------------------------------------
  button.attachClick(singleClick);              // 單擊
  button.attachDoubleClick(doubleClick);        // 雙擊
  button.attachLongPressStart(longPressStart);  // 長按開始
  button.attachDuringLongPress(longPress);      // 長按過程中
  button.attachLongPressStop(longPressStop);    // 長按結束
  //--------------------------------------------------------------
  lcd.init();           // 初始化 lcd
  lcd.backlight();      // 開啟背光
  //--------------------------------------------------------------
}

void loop() {
  //----------------------------------------------------------
  //串列埠監看視窗輸入
  //----------------------------------------------------------
  if (Serial.available()) //若串列埠有輸入資料,則執行下列程式區塊
  {
    input = readNumber();
    if (input >= 0 && input <= 9999)
    {
      count = input;
    }
    else
    {
      //若輸入字串無效(其他)
      Serial.println("Unknown range.");
      Serial.println("Please enter a number(0~9999):");   // 輸入提示
    }
  }

  //----------------------------------------------------------
  unsigned long currentMillis = millis();

  if (currentMillis - previousMillis >= interval)
  {
    previousMillis = currentMillis;
    //----每經過一個interval的時間,想做的事----
    if(startCount == 1)
    {
      count--;
      if (count==0)
      {
        startCount = 0;
      }
    }
    //--------------------------------------
  }

  //----------------------------------------------------------
  button.tick(); // 定期偵測按鈕狀態
  //----------------------------------------------------------
  // 設定與轉換七段顯示器每個位元要顯示的數字
  num[0] = count / 1000 % 10;   // 千位
  num[1] = count / 100 % 10;    // 百位
  num[2] = count / 10 % 10;     // 十位
  num[3] = count % 10;          // 個位
  lcd.setCursor(0,0);
  lcd.print(num[0]);            // 顯示第一位
  lcd.setCursor(2,0);
  lcd.print(num[1]);            // 顯示第二位
  lcd.setCursor(4,0);
  lcd.print(num[2]);            // 顯示第三位
  lcd.setCursor(6,0);
  lcd.print(num[3]);            // 顯示第四位
  //----------------------------------------------------------
}

// 單擊處理
void singleClick() {
  Serial.println("Button Click.");
  startCount = !startCount;     // 取反相
}

// 雙擊處理
void doubleClick() {
  Serial.println("Button Double Click.");
}

// 長按開始
void longPressStart() {
  Serial.println("Button Long Press Start.");
}

// 長按過程中
void longPress() {
  Serial.println("Button Long Press ......");
}

// 長按結束
void longPressStop() {
  Serial.println("Button Long Press Stop.");
  count = 1000;                 // 重置計數器
  startCount = 0;
}

// 讀取一個整數
int readNumber()
{
  while (!Serial.available());  // 等待串列埠輸入
  String input = Serial.readStringUntil('\n');  //讀取一行的輸入資料,直到換行符號為止(按下enter鍵)
  input.trim();                 //去除輸入字串前後的空白字元
  Serial.println(input);        //印出輸入字串
  return input.toInt();         //轉換為整數
}
作業練習:請使用OneButton Library、I2C LCD完成一個計時碼表功能。
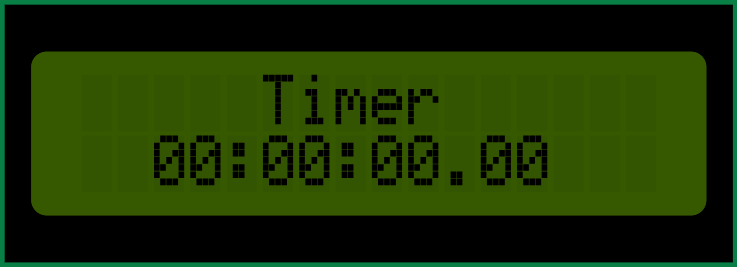
- 開機後,LCD顯示器顯示計時碼表的初始時間 00:00:00.00。
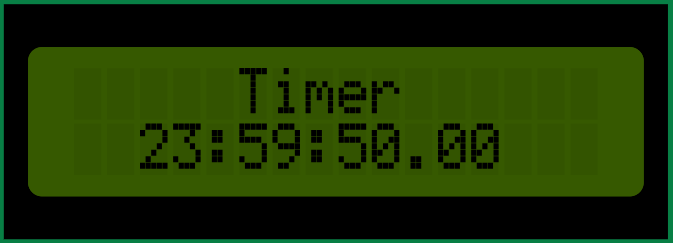
- 每按一下按鈕開關,可開始或停止計時碼表(每百分之一秒加1,直到23:59:59.99歸零)。
- 長按按鈕開關,計數器重置為初始時間。
- 任何過程中,可以透過監看視窗改變計時碼表的數值。
- 請在Wokwi網站模擬後,並完成實體接線。